Tuesday, February 23, 2016

Instant Pot French Onion Soup

Adapted from: Serious Eats

I was really excited to see that I could make French Onion Soup in the Instant Pot!  We love it and are huge fans of the Cook's Illustrated method.  So, hearing that this would be much less time and great results and we were hooked!

My Method:

Ingredients

  • 6 tablespoons unsalted butter, plus more for toasts
  • 3 pounds yellow or mixed onions, sliced 1/8 inch thick
  • 1/2 teaspoon baking soda
  • Kosher salt and freshly ground black pepper
  • 1/2 cup (120ml) dry sherry, such as Amontillado
  • 2 quarts store-bought low-sodium chicken stock
  • 2 sprigs thyme
  • 1 bay leaf
  • 1 teaspoon (5ml) cider vinegar
  • 8 bowl-size slices rustic bread, toasted until crisp
  • 1 medium clove garlic
  • 1 pound (450g) Gruyère cheese, grated
Directions
  1. 1.
    Melt butter in Instant Pot over medium heat. Add onions and baking soda and stir to combine. Season with salt and pepper. Cook, stirring, until onions slightly soften and start to release liquid, about 3 minutes. Cook at high pressure for 20 minutes. Release pressure by allowing steam to vent, then remove lid.
  2. 2.
    Continue cooking with lid off, stirring constantly, until liquid inside has completely reduced and the onions are deep brown and sticky, about 5 minutes.
  3. 3.
    Add sherry and bring to a simmer, scraping up any browned bits. Cook until alcohol smell is mostly gone, about 3 minutes. Add stock, thyme, and bay leaf, raise heat to medium-high, and bring to a simmer. Lower heat and simmer for 10 minutes.
  4. 4.
    Add fish sauce, if using, and cider vinegar and season with salt and pepper (if necessary). Discard thyme sprigs and bay leaf.
  5. 5.
    To Serve: Preheat broiler and move oven rack to top position. Butter toasts and rub with garlic clove until fragrant. Spoon a small amount of broth into the bottoms of 4 ovenproof serving bowls, then top with half the toasts. Sprinkle some grated Gruyère on top of toasts, then spoon more soup and onions on top, nearly filling the bowls. Set the remaining 4 toasts in each bowl, pushing to nearly submerge them. Top with remaining grated cheese and set bowls on a rimmed baking sheet. Broil until cheese is melted and browned in spots. Garnish with chives and serve.

My Results & Thoughts:
It was okay.  Flavors were not as complex as Cook's Illustrated recipe.  Peter couldn't tolerate smell of pressure cooked onions.  Probably won't try this again.

Instant Pot Yogurt


Adapted from: Tidbits Yogurt Recipe and Salad in a Jar

I used the basic recipe from Tidbits, minus the powdered milk and read most of Salad in a Jar's advice on homemade yogurt to make my first batch.


My Method:

Ingredients

  • 1 gallon whole milk
  • 1/4 cup Fage whole greek yogurt (though you can use any fresh yogurt with active cultures)

Directions

  1. Add 1 gallon whole milk to Instant Pot
  2. Press "Yogurt" button and press "Adjust" to boil
  3. After boiling (about 1 hour and the Instant Pot will beep at you) take temperature of milk with instant read thermometer.  If it is less than 180 degrees, turn off Instant Pot and press "Yogurt" button again and "Adjust" to boil.  You will likely get the milk to 180 pretty quickly on the second boil, so you do not need to wait until it beeps.  Check temperature with instant read thermometer after about 20 minutes.  
  4. Once your milk has reached 180 degrees, cool milk to less than 115 degrees.  I put the Instant Pot liner into a bowl of cool water in the sink and stirred with whisk.  It took about 15 minutes to cool this way.  You can cool in the Instant Pot but it will take about an hour.
  5. Once cooled, take about 1 cup warm milk out of pot and add to bowl with yogurt starter.  Whisk until well combined.
  6. Add whisked milk/yogurt back to pot and whisk to combine.
  7. Place Instant Pot liner back in base unit.  
  8. Press "Yogurt" button and adjust time to 9 hours.  
  9. After this is done, you will want to strain your yogurt.  There are MANY ways to do this.  Strain for about 1 hour.
  10. After straining, you may want to whip your yogurt - I did!.  You can also add milk if it got too thick during straining.
  11. Transfer to airtight container for storage in the fridge.

My Results & Thoughts:
Delicious!  Straight out of the Instant Pot it's not as tangy as my Fage but I'm told it will get tangier in the fridge.   It's creamy, rich and perfect!

A note about straining - I really, really, really didn't want to have to purchase anything extra to strain my yogurt.  I searched the internet to find out how others strained their yogurt.  I thought about my salad spinner, but wanted to see if anyone had used that before.  I found confirmation of my idea, courtesy of needlesspounds.com. I used my salad spinner colander propped in the salad strainer bowl with a shot glass.  I lined the colander with a clean white t-shirt.  It works great and nothing extra to buy or store.

Next Day Update:  WOW!  It set up overnight and is PERFECT!  It's just as thick and creamy as the Fage and maybe even a touch creamier!  I don't think I'd change a thing!


Monday, February 22, 2016

Stroganoff Nicole

Adapted from:  None

My Method:

Ingredients

  • 2.5 lbs beef (any cut will do - though leaner cuts might take a bit longer to get tender) cut into 1 inch cubes
  • 1/2 medium onion
  • 1/2 can chopped black olives
  • 1/2 c sliced mushrooms (I used baby bellas)
  • 1/2 c water + 1/2 tsp beef bullion granules
  • 2 cans cream of mushroom soup
  • 1 c sour cream

Directions

  1. Sweat onions and mushrooms on Saute setting.  
  2. Add chopped black olives and Saute with onions and mushrooms.
  3. Add cubes beef and brown.
  4. Add water and bullion granules
  5. Add two cans cream of mushroom soup on top of beef - do not mix
  6. Close Instant Pot and ensure release valve is set to "sealing".  Set Instant Pot to "Manual" and adjust time to 10 minutes.
  7. When Instant Pot is done allow for 10 minute natural pressure release.
  8. Turn Instant Pot back on to Saute and mix well - allow to thicken a bit.  After mixing, add sour cream and mix well.
  9. Allow to simmer for a few minutes.
  10. Serve over rice, pasta or green beans.

My Results & Thoughts:
Turned out really well!  Very similar to our stovetop version but much less messy and easier to clean up.  Flavors weren't quite as incorporated.  Perhaps browning meat first then veggies would allow for better flavor development.  Would also use sliced olives instead of chopped and add some olive juice while sweating.  Could also simmer longer to incorporate flavors.

Wednesday, February 17, 2016

Pot Roast Pressure Style


Adapted from: Flaherty's Signature Pot Roast

My Method:

Ingredients

  • 3 lbs Chuck Arm Roast, thawed
  • garlic powder
  • celery salt
  • salt and pepper
  • water
  • 1 packet french onion soup mix
  • 1 can cream of mushroom soup
  • 1 medium onion
  • 2 rutabagas
  • handful baby carrots

Directions

  1. Season both sides of roast with celery salt, garlic powder, salt and pepper
  2. Heat oil in Instant Pot - Saute on High
  3. Brown both sides of roast in Instant Pot
  4. Leaving Saute on, add water to just below top of roast
  5. Sprinkle packet of onion soup mix on top of roast - do not mix with water
  6. Pour can of cream of mushroom soup on top of onion soup mix - do not mix with water, spread with fork over top of roast
  7. Close lid of Instant Pot and ensure steam valve is set to "sealing"
  8. Switch Instant Pot to Manual and increase time to 50 minutes
  9. While Instant Pot is cooking roast, roughly chop onions and rutabagas 
  10. Once Instant Pot is done with roast, allow for 10 minute natural pressure release
  11. After 10 minutes open steam valve to "venting" once all pressure is gone, open pot and remove roast to covered pan to keep warm
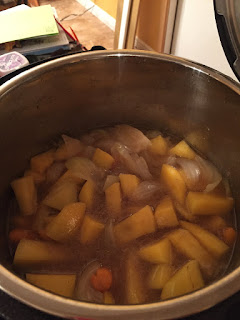
  12. Add onions, rutabagas, and carrots to juice in bottom of Instant Pot.  If juice is too thick, add enough water to thin slightly.
  13. Close lid of Instant Pot, ensure steam valve is set to "sealing" and turn on Manual.  Decrease time to 6 minutes.
  14. Once Instant Pot is done, quick release pressure by turning steam valve to "venting" and serve 

My Results & Thoughts:
Will totally make this again!  Could probably do 45 minutes with full natural pressure release.  I didn't have to thin my juice for the veggies at all and would probably cut back on the water just a little bit next time.  Veggies were perfect - tender but not mush.

Instant Pot Omlette

Tried this for lunch today - there are a few things I would change and not sure this will become a regular part of the rotation for me.

Adapted from: None - my own experiment!

My Method:

Ingredients
4 eggs
2 tbs heavy cream
1 pat butter
1/4 cup shredded cheese
salt and pepper to taste

Directions:

  1. Mix eggs, cream, salt and pepper gently in a bowl (I don't like when eggs are uniformly yellow - I like them so there's a bit of egg white stuck together).  
  2. Pour mixture into sprayed pyrex (I used PAM).  
  3. Place pyrex on trivet with 1 1/2 c water in the bottom of the Instant Pot.  
  4. Close lid and turn steam valve to sealing.  Manual pressure for 10 minutes with immediate quick release.  
  5. Turn out contents of pyrex on a plate and top with cheese.  Allow cheese to melt.

My Results & Thoughts:

What I didn't like...
Butter made an oil slick on top of the eggs and made it feel slimy.  Yuck.  I hate "wet" eggs.  I would omit the butter in the future.  I think the eggs will still be a little "wet" from the steam.

Didn't realize any time savings with this method however, you don't have to watch the eggs or turn them, so you can do something else while they're cooking.

Eggs stuck to pyrex even with PAM.  Messier to clean than my stainless on the stovetop.

What I did like...
Eggs were fluffy and not overdone.   They tasted fine.

Tuesday, February 16, 2016

Porcupine Meatballs

Today I made an old favorite - Porcupine Meatballs

Adapted from: Snappy Service Cafe

My Method:
Prep time:  


Cook time:  
Serves: 4-6
Ingredients
  • 2 lbs ground beef
  • ¾ cup uncooked long grain rice
  • 2 teaspoons onion powder
  • 15 ounces tomato sauce
  • 13 ounces water (fill up the tomato sauce can about an inch from the top)
  • 1 teaspoon Worcestershire sauce
  • ½ teaspoon celery salt
  • ½ teaspoon pepper
  • ¼ teaspoon celery seeds
Instructions
  1. Combine all ingredients, except tomato sauce and water. 
  2. Heat the liquids in the pressure cooker using the saute button 
  3. Shape into meatballs and drop in meatballs as you make them (having more than one layer of meatballs is fine, but only the ones on top will have the rice "porcupine" out) 
  4. Close cover and turn to close.  Ensure steam valve is set to sealing.
  5. Press "Manual" and set time to 15 minutes
  6. After Instant Pot beeps, let pot sit for 10 minutes and manually release pressure.
My Results & Thoughts:


It was delicious and had no problems with dry meatballs or uneven rice cooking like I've had in the oven in the past.

Monday, February 15, 2016

Pork Chops in Mushroom Gravy

My first meal in the Instant Pot!

Adapted from: Pressure Cooking Today

My Method:

Ingredients
  • 2 bone-in thick pork chops
  • 2 tablespoons vegetable oil
  • 1 1/2 cups water
  • 1 can cream of mushroom soup
  • Salt and Pepper to taste

Directions
  1. Pat chops dry and season liberally on both sides with salt and pepper.
  2. Put oil in the cooking pot and select Saute on the Instant Pot. 
  3. When oil begins to sizzle, brown chops on both sides. When browned remove to a platter.
  4. When you've finished browning the chops add the water to deglaze the pan and stir to loosen any brown bits from the pan. Stir in the mushroom soup. Add pork chops and any juices that may have accumulated on the platter to the cooking pot.
  5. Lock lid in place and select Manual. Set timer for 18 minutes and press start. Once the timer beeps, use a Natural Pressure for 10 minutes, followed by Quick Pressure Release. When valve drops carefully remove the lid.
  6. Remove chops to a large serving bowl. If necessary, thicken gravy in cooking pot on simmer with a slurry of water and flour. Pour gravy over chops to serve.
My Results & Thoughts:

The pork chops were a little dry and the sauce was pretty thin.  The original recipe called for four pork chops, so I think I would use a little less water (probably just enough to rinse the cream of mushroom can) and about 15 minutes of pressure next time.